5. Writing Software for Your Project
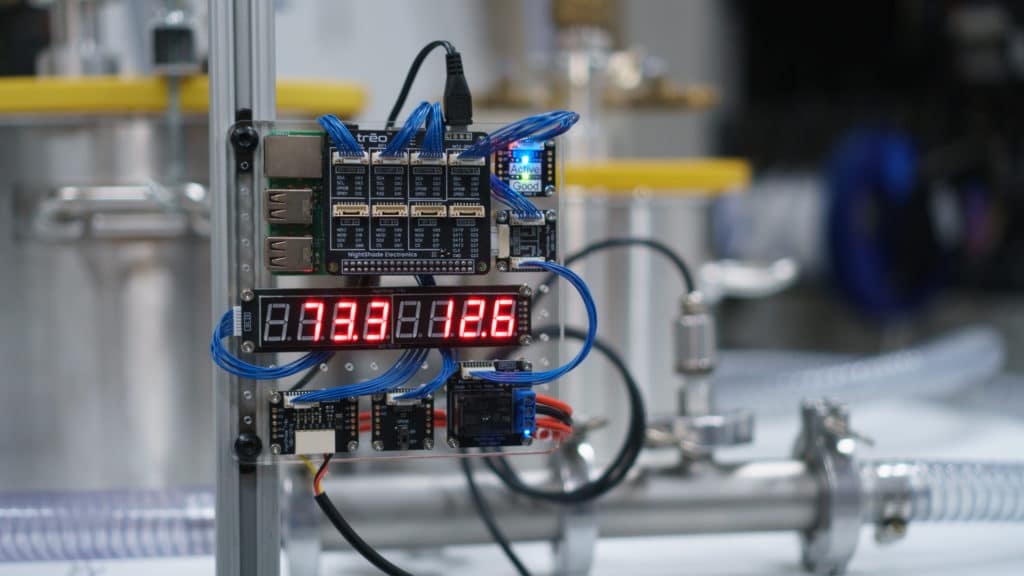
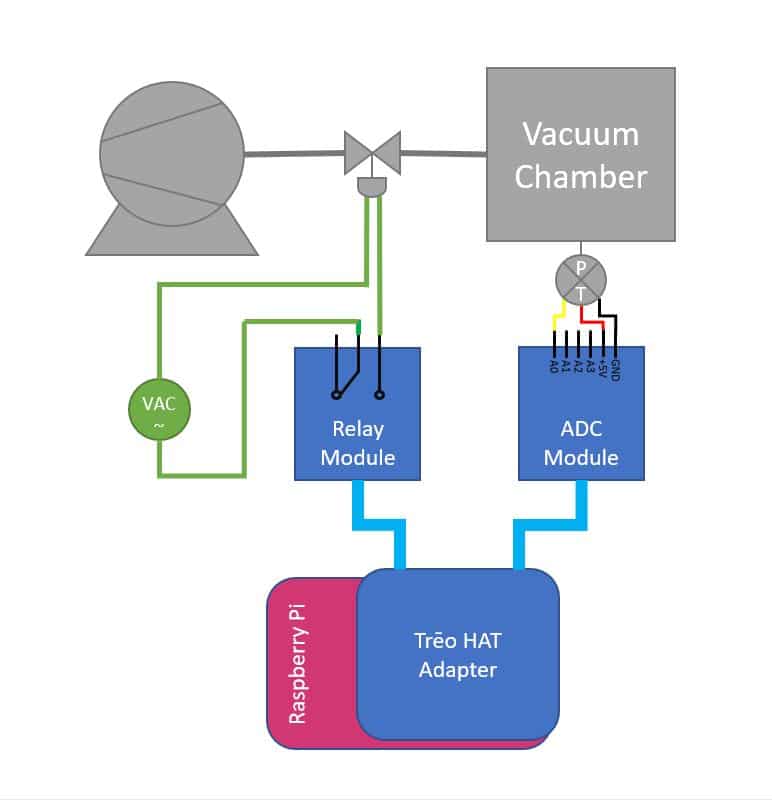
The parts have been selected and wired together, and the software has been installed. The only step remaining is to write the application software for your project. Now we’re going to write a program for our example project of a vacuum pressure controller using a Raspberry Pi reading a pressure sensor and controlling a solenoid valve between the vacuum pump and the vacuum chamber.
The program has to read the voltage from the ADC, convert the voltage to the corresponding pressure based on the pressure sensor’s specs, and turn the solenoid on and off to maintain a specific pressure in the vacuum chamber. Opening the solenoid (on) connects the vacuum chamber to the pump, which lowers the pressure. When the solenoid value is closed (off), the chamber is sealed from the pump and pressure will remain the same or rise because of minute leaks in the system or outgassing from any volatile substances in the vacuum chamber.
The simplest form of control for this system would be to compare the current pressure to the set point and turn the solenoid on if the pressure is too high and close the solenoid if the pressure is too low. This simple of a program will result in a lot of oscillation in the pressure and a lot of cycling in the relay and solenoid. Mechanical devices like relays and solenoid values will wear out quickly if the are rapidly cycled. Instead, we are going to define an on/off cycle time and vary the on-time during each cycle to adjust how much vacuum is applied to the chamber. Since the system’s pressure will respond relatively slowly, we’ll define a cycle as 5 seconds (5000ms). The relay will be turned on at the beginning of the cycle when the pressure is too high and it will be turned off later in the 5 second period. This duty cycle will allow us to implement a PI control algorithm which will very accurately maintain the pressure.
On the Raspberry Pi we can program in C++ or Python. In this case, we will use Python. This will allow us to draw from the vast array of Python modules in future developments of this project like if we decided to use the Raspberry Pi’s WiFi to post the vacuum chambers status to a cloud server.
We begin programming by opening the Raspberry Pi’s Python 3 editor and importing the NightShade_Treo module. Be sure that you have downloaded the datasheets for all the modules you are using. You will need to use them as a code library reference. We will also import the sleep function from the time module.
import NightShade_Treo
from time import sleep as sleep
Next we define instances of the two Trēo modules that we are using in this project, the relay and the ADC. The ADC uses the NightShade_Treo.MAX11612() module and the relay is controlled with the NightShade_Treo.DigitalOutput() module. These constructors are found in their datasheets.
relay = NightShade_Treo.DigitalOutput(16) # Use GPIO0 pin number from adapter
adc = NightShad_Treo.MAX11612(1) # The I2C port designator for the RPi is 1
Now lets add some variables for the control algorithm. We’ll need them later.
setPointPressure = 2500 # Pa
cycleLength = 5000 # miliseconds
minOnTime = 250 # Won't open solenoid unless onTime > minOnTime
currentError = 0
integratedError = 0
At this point we need to write the main loop of the program. From the datasheets, we can see that the ADC measurement is triggered using the acquireAllChannels() method and the channel 0 measurement is returned with the readChannel(0) method. We also see that the relay can be actuated with the on() and off() methods. We’ll use these in the main loop.
# Run forever
while True:
   # Read the voltage from the pressure sensor in mV
   adc.acquireAllChannels()
   voltage = readChannel(0)

   # Calculate pressure from voltage | 0.5 to 4.5V = 0Pa to 101325Pa (1atm)
   pressure = 101325*((voltage - 500) * 101325/(4500 - 500))

   # Proportional Control
   currentError = setPointPressure - pressure
   onTime = currentError * 1 # kp = 1ms/Pa error

   # Integral Control
   integratedError += currentError
   if integratedError > cycleLength:
      integratedError = cycleLength
   onTime += integratedError * 1 # ki = 1ms/1Pa error

   # Bound the output
   if onTime > cycleLength:
      onTime = cycleLength
   if onTime < minOnTime:
      onTime = 0

   # Run solenoid
   if onTime > 0:
      relay.on()
      sleep(onTime / 1000) # Wait for on-time to finish
   offTime = cycleLength - onTime
   if offTime > 0:
      relay.off()
      sleep(offTime / 1000)
This loop starts with measuring the pressure sensor signal voltage with the ADC and converting that voltage to the actual pressure reading. The pressure sensor outputs 0-101325Pa as a signal of 0.5-4.5V. That gives us a conversion of 101325Pa/(4500mV-500mV) = 25.33Pa/mV for every mV above 0.5V. So, P,Pa = 25.33Pa/mV * (V,mV – 500mV).
Then it calculated the amount of time per cycle that the solenoid will be on. The proportional control adds an amount of on-time based on the error in the current measurement while the integral control add to the on-time based on the accumulated (integrated) error. The proportion control provides a very rapid response to error while the integral control eventually removes any offset in steady-state operation.
Finally, the onTime variable is bounded within the total cycle time (it can’t be longer than the full cycle and it can’t be negative) and the solenoid it turn on for the onTime and left off for the remainder of the cycle. If the solenoid is on for the whole cycle it does not turn off and if the onTime is less than minOnTime it does not turn on.
This program can be run in the Python 3 environment or from the command line using the command: python3 <filename.py>
This completes the Getting Started tutorial series. Now you should have a good understanding of how to use the Trēo system to get your projects moving quickly.
The full example program is listed below for your reference.
import NightShade_Treo
from time import sleep as sleep

relay = NightShade_Treo.DigitalOutput(16) # Use GPIO0 pin number from adapter
adc = NightShad_Treo.MAX11612(1) # The I2C port designator for the RPi is 1

setPointPressure = 2500 # Pa
cycleLength = 5000 # milliseconds
minOnTime = 250 # Won't open solenoid unless onTime > minOnTime
currentError = 0
integratedError = 0

# Run forever
while True:
   # Read the voltage from the pressure sensor in mV
   adc.acquireAllChannels()
   voltage = readChannel(0)

   # Calculate pressure from voltage | 0.5 to 4.5V = 0pa to 101325pa (1atm)
   pressure = 101325*((voltage - 500) * 101325/(4500 - 500))

   # Proportional
   currentError = setPointPressure - pressure
   onTime = currentError * 1 # kp = 1ms/pa error

   # Integral
   integratedError += currentError
   if integratedError > cycleLength:
      integratedError = cycleLength
   onTime += integratedError * 1 # ki = 1ms/1pa error

   # Bound the output
   if onTime > cycleLength:
      onTime = cycleLength
   if onTime < minOnTime:
      onTime = 0

   # Run solenoid
   if onTime > 0:
      relay.on()
      sleep(onTime / 1000) # Wait for on-time to finish
   offTime = cycleLength - onTime
   if offTime > 0:
      relay.off()
      sleep(offTime / 1000)


